Date: 8/6/2024
Bulletin: Quality Alert HR.0004
Author: Nick Hollis
Title: T-piece Inner Retaining Ring
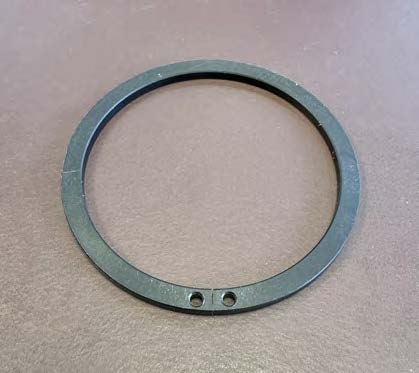
Part Number: 26203
Assemblies Affected:
240.6530.000: Prism 2 BMCL w/Petrel
240.6530.000.M: Prism 2 BMCL w/Petrel (Metric)
240.6606: BMCL Complete Kit / OPV (away from diver / right side)
26221: Exhaust T Assembly
26227: Inhale ADV Tee Assembly, DSV
240.6530.000.M.B: Prism 2 BMCL w/Petrel – Base (Metric)
240.6530.000.B: Prism 2 BMCL w/Petrel – Base
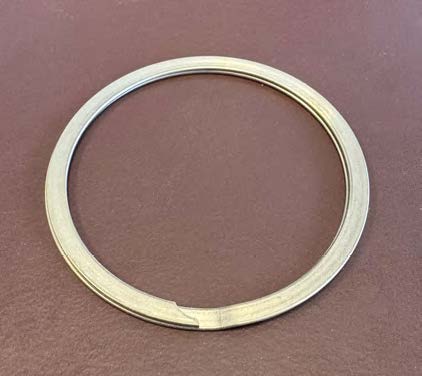
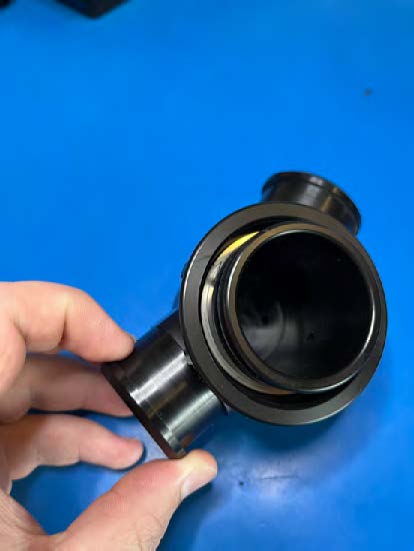
Description: Due to reports of the original BMCL inner retaining ring experiencing failures during normal operation, we are advising all users to immediately stop using the inner 26203 plastic snap ring and upgrade to the new 26260 stainless steel version. This new steel version is a spiral design which should only be installed once, and does not need to be removed during unit maintenance or service. The t-piece can still be serviced with the ring installed, as it allows replacement of the o-rings as needed. Below are images of the old (26203) retaining ring vs the new (26260) retaining ring for visual reference, in addition to an installation procedure (continued on page 3):
PERFORMANCE UPGRAGE HR.0004
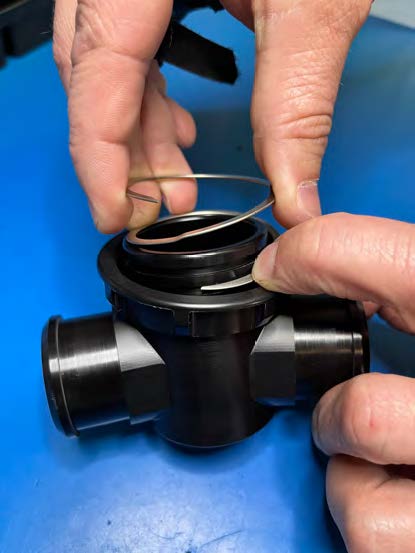
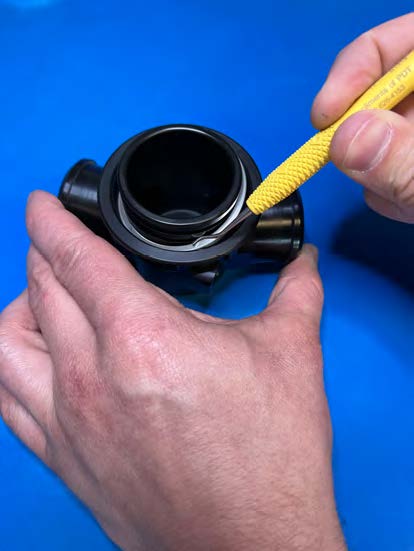
Installation: To install the new stainless ring, please take note of the following:
1. Remove both the inhale and exhale T-pieces from the BMCL bag and remove both o-rings from the fitting.
2. Using a pair of snap ring pliers, remove the old plastic snap rings (PN 26203). Caution: If you do not have snap ring pliers, do not attempt to remove the snap ring as you could damage the t-piece body. Once the plastic snap rings are removed, discard them. Remove the outer retaining ring and visually check the machined groove surfaces. Wipe with a clean towel to remove any debris.
3. Re-install the outer T-piece retaining rings on both T-pieces.
4. Install new inner metal retaining ring (26260) by feeding into the lowest machined groove. The spiral ring can be separated slightly to make installation easier, but take caution not to expand the ring too far apart. Press downward firmly on the ring, working it into the groove, until all sections have compressed together and are locked into place. Once the metal ring can move side to side without any interference, and both the rings can spin freely, it is installed.
5. After cleaning and lubricating the o-rings, re-install on both T-pieces. Note: Prior to final assembly, we recommend one final check of the outer retaining ring by pulling upward to ensure it is locked in place. (See following photos for a visual of the installation procedure – Steps #1-4)

6. Re-assemble T-pieces onto the BMCL, complete assembly and test procedure. Check for leaks in the system.
Replacement Options – This is a mandatory replacement notice. We recommend stopping use of the plastic ring immediately by discarding and upgrading to the stainless version before additional use of your rebreather. To order an upgraded ring set, please contact your local Hollis Rebreather dealer, or email us at service@hollisrebreathers.com. Parts are free of charge at either location, plus any shipping/handling from the factory direct.

Hollis Rebreathers, 1540 North 2200 West, Salt Lake City, UT 84116 USA